- All
- Product Name
- Product Keyword
- Product Model
- Product Summary
- Product Description
- Multi Field Search

Views: 0 Author: Site Editor Publish Time: 2025-08-20 Origin: Site


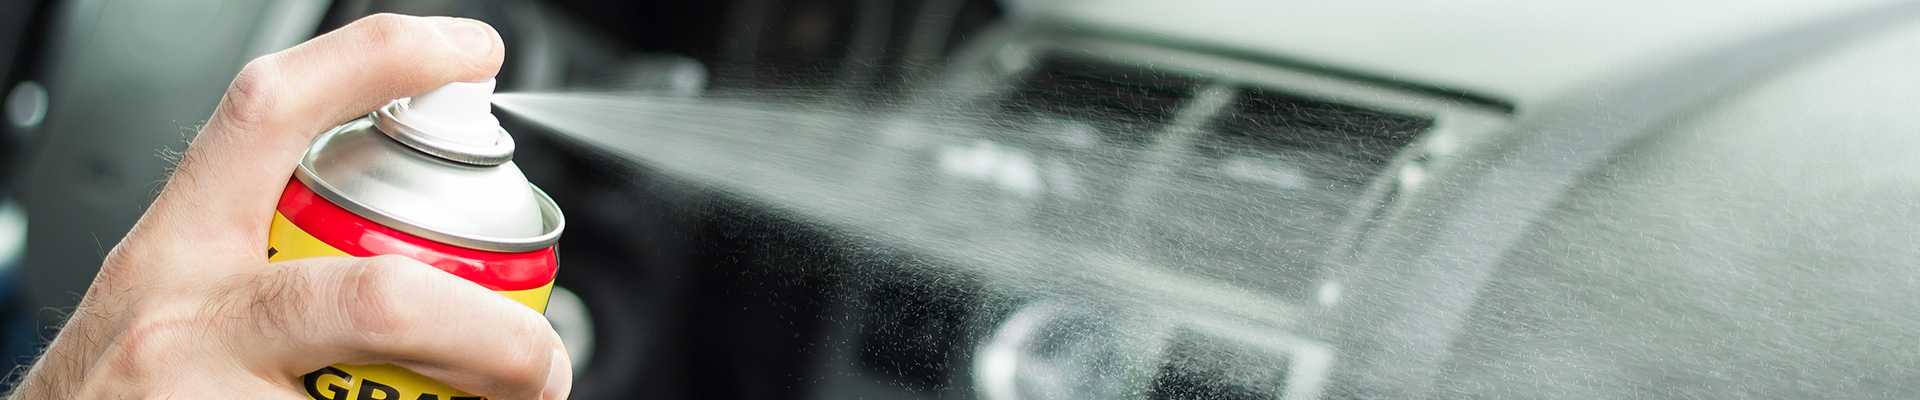
You can often fix a blocked aerosol can by taking off the nozzle and washing it with warm water. If the spray stops, look at how you are holding the can. Many blockages happen when you use aerosol cans upside down or at strange angles. The propellant gas comes out first and leaves liquid inside. This makes the spray not work. Sometimes, leaks or a blocked spray channel cause trouble. Understanding how aerosol cans work helps you solve problems fast.
Take off the nozzle and put it in warm water or a safe solvent. This helps clear blockages in a safe way.
Keep aerosol cans standing up. Clean the nozzle often to stop clogs from happening.
Wear safety gear and work where air moves well. This keeps you safe when using aerosol cans.
Put aerosol cans in cool, dry spots. Keep them away from heat so pressure does not build up or leak.
If cleaning does not fix the spray, change the nozzle. If problems inside the can do not go away, throw the can away safely.
When you look at an aerosol can, you see a simple metal cylinder. Inside, though, you find several important parts working together. The pressurised container holds both the product and the propellant. The propellant is a special gas or liquid that creates pressure inside the can. This pressure helps push the product out when you use the spray.
Here are the main components inside a standard aerosol can:
Actuator: This is the spray button you press. It controls the angle, shape, and consistency of the aerosol spray.
Valve Cup (Mounting Cup): This metallic cup holds the valve parts in place and seals the can.
Stem and Stem Gasket: The stem connects the actuator and spring. The gasket keeps the valve opening airtight.
Spring: This part keeps pressure on the stem gasket so the valve stays closed until you press it.
Housing: The housing holds the spring and attaches the dip tube to the valve.
Dip Tube: This hollow tube reaches the bottom of the can. It lets the product move up and out when you press the actuator.
Tip: The dip tube makes sure you use almost all the product inside the pressurised container. Always hold the can upright for best results.
The spray mechanism is what turns the liquid inside the aerosol can into a fine mist. When you press the actuator, you open the valve. The propellant pushes the product up the dip tube and out through the nozzle. The nozzle shapes the aerosol into a mist or stream.
The propellant plays a key role in this process. It exists as a liquid with a boiling point just below room temperature. This creates vapor pressure inside the can, which is higher than the air outside. When you press the valve, the pressure forces the product out. As the gas escapes, more liquid propellant evaporates to keep the pressure steady. This lets you get a consistent spray every time.
The valve and nozzle work together to control the spray pattern. The valve opens when you press the actuator, letting the product escape. The nozzle directs the product, shaping it into a mist or stream. The design of the nozzle can change how the aerosol spray looks and feels.
If you want a smooth and even spray, make sure the nozzle is clean and the can is upright. The pressurised container, propellant, valve, and nozzle all work together to give you reliable aerosol performance.
You may notice your aerosol cans stop working or only release a weak spray. The first step is to figure out where the blockage is. Most problems happen in the nozzle or the valve. Sometimes, dried product or dust clogs the tiny opening. You should check the nozzle for visible buildup. If you see residue, you know the blockage is likely there. If the nozzle looks clean, the problem might be deeper inside the aerosol can.
Tip: Always hold the aerosol can upright when you test it. This helps you see if the blockage is in the nozzle or the dip tube.
You can clear most blockages with simple tools and safe cleaning solutions. Follow these steps to clean the nozzle:
Remove the nozzle from the aerosol can. Do not try to force the blockage out by spraying, as this wastes propellant.
Soak the nozzle in a small container of paint thinner or a sprayer cleaner. These solutions break down dried product and residue. Let the nozzle sit long enough for the solvent to fill the stem.
Plug the stem with your thumb, then take the nozzle out of the solvent. Pour any extra solvent back into its container.
Use compressed air or an air hose to blow out the solvent and loosen debris. Hold the nozzle upside down and repeat this step twice for best results.
Store the cleaned nozzle separately. Wait before putting it back on the aerosol can to prevent re-blockage from leftover product.
For a quick fix, you can fit the nozzle onto a WD-40 can and spray. WD-40 helps keep the nozzle and exit hole clean after you finish.
Sprayer cleaners work well because they dissolve both water and oil-based residues. Contact cleaners also help remove oils and other contaminants. These cleaners are safe for plastics and rubber, so you do not damage the nozzle. Avoid using household cleaners like chlorine or ammonia, as they may harm the spray mechanism.
Note: Be gentle if you use a pin or needle to clear the nozzle. You do not want to widen the spray hole or change the aerosol spray pattern.
After you clean the nozzle, you need to test the aerosol can to see if the blockage is gone. Follow these steps:
Reattach the nozzle to the aerosol can.
Spray into a sink or onto a piece of scrap paper. Watch for a steady, even mist.
Hold the aerosol can upside down and spray. This helps blast water or solvent from the nozzle tip and checks if the blockage is clear.
Perform several test sprays during the cleaning process. Look for improvement in the spray output.
If the spray pattern looks normal and the aerosol comes out smoothly, you have cleared the blockage.
You can repeat these steps if the blockage returns. Regular cleaning keeps your aerosol cans working longer.
You need to be careful when using aerosol cans. These cans have dangerous goods inside and are under pressure. If you do not use proper aerosol safety, you could get hurt. The tips below help you stay safe and protect your space.
Use aerosol cans where there is lots of fresh air. Spraying in small rooms can fill the air with bad chemicals and flammable liquids. Breathing these can make you sick or start a fire. Open windows or turn on fans to let air move outside. Doing this helps keep you from breathing in harmful fumes and keeps you safe.
Tip: Do not spray aerosol products near fire, heat, or anything that can start a flame. Vapors from aerosol cans can catch fire very fast.
Wear protective gear when you use aerosol cans, especially with dangerous goods or hazardous chemicals. Gloves keep your skin safe from getting irritated. Safety goggles stop spray or mist from getting in your eyes. A mask or respirator helps you not breathe in bad particles. These things lower the hazard and help you work safely.
Gloves: Keep your skin safe from flammable liquids or chemicals.
Goggles: Stop sprays from getting in your eyes.
Mask: Help you not breathe in tiny aerosol particles.
Heat and fire are very risky when you use or keep aerosol cans. Heat makes the pressure inside the can go up. This can make the can explode or burst. Never leave aerosol cans in hot places like cars or in the sun. Do not throw them in fires or campfires. Even empty cans can still have pressure and flammable liquids, so they are still a hazard.
Keeping aerosol cans in hot places can make them explode.
Throwing cans in fire is very dangerous.
Broken or punctured cans can let out dangerous goods and hurt people.
It is important to throw away aerosol cans the right way. Aerosol cans can have leftover product and propellant inside. If you throw them away the wrong way, they can leak bad chemicals and hurt the environment. Many places treat these cans as hazardous waste. Always follow your local rules for throwing them away to stop pollution.
Note: Industry rules say aerosol cans must have clear labels. Look for warnings about heat, pressure, and hazardous contents. These labels help you know the risks and use the product safely.
Sometimes, your aerosol can stays blocked after you clean the nozzle. You can try these steps to fix tough clogs:
Put the spray nozzle in hot water for three to five minutes. Use hot, but not boiling, water so you do not melt the plastic.
Run cool water over the nozzle. The change in temperature can help break up clogs.
Shake the aerosol can well before you use it. This mixes the product and propellant together.
Turn the can upside down and shake it again. This can build pressure and help clear the clog.
Take off the nozzle and put it in lacquer thinner. This helps dissolve dried paint or sticky stuff.
Use a pin to gently poke out any dried product in the nozzle. Never poke the can itself, because this can let out dangerous goods and hurt you.
Tip: Rinse the nozzle after you use it and keep the can standing up. Clean the nozzle before you store the can for a long time. Doing this helps stop clogs from happening again.
Sometimes, cleaning does not fix the problem. You might need to get a new nozzle. Watch for these signs:
The actuator button is still clogged after you clean it.
The spray does not get better.
The clog seems to be in the nozzle, not the valve.
Pick a nozzle tip that is the same size as the old one. Nozzle tips can look alike, but they are not always the same. Using the wrong size can be unsafe, especially with dangerous goods. Getting a new nozzle usually makes the spray work again and keeps your aerosol can safe.
Note: Always read the manufacturer’s instructions before you change the nozzle. This helps you avoid leaks and makes sure the spray works right.
If your aerosol can still will not spray after you clean and change the nozzle, there may be problems inside. Some common problems are:
Dried paint or primer inside the nozzle or cap blocks the flow.
Leftover debris inside the stem or nozzle stops the spray.
Uneven pressure inside the can makes the spray sputter or spit.
The nozzle is not put together right, so it leaks or sprays badly.
Gaskets, O-rings, or valves are not lined up, so the can does not work well.
Solids build up near the orifice and block the spray.
Scratches or drops damage the nozzle and make it not work.
Erosion or rust changes the inside and makes the spray worse.
Check the nozzle and can for any damage. Make sure you put the nozzle on the right way after you clean or change it. Checking and putting things together the right way helps stop leaks and keeps the spray even.
�� Taking care of your aerosol can and using it gently helps it last longer and keeps you safe from dangerous goods.
You can help aerosol cans last longer by storing them right. Keep them in a cool and dry place. Do not put them in the sun. Hot places make the pressure go up inside the can. This can cause leaks or even make the can burst. Wet places can make the can rust and hurt the valve. Always keep aerosol cans standing up. This stops liquid from blocking the dip tube or valve. If you store and handle cans the right way, you lower the chance of blockages. This helps the spray work well every time.
Tip: Never leave aerosol cans in your car or near heaters. Too much heat can break the seals and make the can stop working.
Taking care of the nozzle helps stop clogs. After you use the can, wipe the nozzle with a clean cloth. This removes any leftover product. If you see buildup, soak the nozzle in warm water or a cleaner that matches the product. You can use a pin to gently clear the spray hole, but do not push too hard. Clean the nozzle often to keep out dried product and dust. Manufacturers say to clean aerosol valves often and use thinner products to stop blockages. Check the seals and gaskets for damage and change them if needed. This keeps the spray even and stops leaks.
Nozzle Care Steps | Why It Matters |
|---|---|
Wipe after use | Stops buildup |
Soak in cleaner | Removes residue |
Inspect seals | Prevents leaks |
Use compatible products | Keeps spray smooth |
Using aerosol cans often helps stop blockages. Shake the can before you use it to mix everything inside. Test the spray every few weeks, even if you do not need it. This keeps the valve and nozzle clear. If you store cans for a long time, check them for rust or damage before using them. Manufacturers say to check valves and test them in different ways to make sure they work. You should use propellants and valves that match the product’s thickness for best results. Using and checking cans often helps you find problems early and keeps them working longer.
�� You can make your aerosol cans last longer by following these easy steps. Good storage, nozzle care, and regular use help your spray stay safe and work well.
You can clear a blocked aerosol can by removing the nozzle, soaking it in warm water or solvent, and using a pin to gently clear debris. Always work in a well-ventilated area and handle the can with care. Regular cleaning and proper storage help you avoid clogs and keep your spray working longer. Most aerosol cans last 2 to 3 years if you store them upright in a cool, dry place. These simple habits help you get the most from every can.
You often see blockages when dried product or dust clogs the nozzle. Using the aerosol can at odd angles or storing it in hot places can also cause problems. Always keep your can upright and clean the nozzle after each use.
You should use a solvent that matches the product inside your aerosol can. For paint, use paint thinner. For lubricants, use a contact cleaner. Avoid strong household cleaners. These can damage the nozzle or affect the spray pattern.
You can use a pin gently to clear the nozzle. Do not push too hard or widen the hole. This keeps your aerosol can spray even and safe. Always wear gloves and eye protection when you do this.
Store your aerosol cans upright in a cool, dry place. Keep them away from sunlight and heat. This helps protect the valve and nozzle. Good storage keeps your spray working longer and prevents leaks.
If cleaning the nozzle does not work, try replacing it with a new one. If the problem continues, the blockage may be inside the can. You may need to safely dispose of the aerosol can and get a new one.